WordPress Themes, Plugins, Tutorials, Tips And More...

Category: Tutorials Page 1 of 21

Tutorials

Use Salesforce Email Templates To Save Time

Email

In most organizations, it is quite common to find staff copying old emails to send them to other different recipients. In case of a standard response email, it is quite common to find the same email composed repeatedly.

To solve this problem of repetition and monotony of work you should consider using Salesforce email templates. These templates can help save a lot of time in organizations especially if you create and organize them properly. They are very useful in sales management, customer support, and sales automation.

4 Types Of Salesforce Email Templates

Text

Text email templates are those that are fully editable by all users to suit different situations.

HTML (With Letterhead)

HTML email templates are those that users with the “Edit HTML Templates” permission and administrators can create based on a letterhead.

Custom HTML

Custom HTML email templates are those that users with the “Edit HTML Templates” permission and administrators can create without using a letterhead. To create these templates you need to either obtain the HTML code or have knowledge of HTML to insert in your template.

Visualforce

Developers as well as administrators can create templates using Visualforce. These emails allow for advanced merging with the recipients data in case the content of the template contains information from multiple records.

For all the four templates, it is possible to include merge fields, text, as well as attached files. In the Visualforce and HTML templates, it is possible to include images. You can use templates when sending an email from the Activity History related list of a record. When sending mass email you can use HTML and text templates. For the Visualforce templates without HTML tags and text templates, a button for checking the spelling of the template is available.

It is good to note that it is not possible to use a Visualforce template to send mass email.

If you wish to access your Salesforce email templates, do the following:

– From Setup, click on Communication Templates | Email Templates in case you have permission to edit public templates.

– In case you do not have permission to edit public templates, click on the arrow down next to your name at the top of any Salesforce page. Select Setup or My Settings from the menu under your name then click on Email | My Templates from the left side of the page.

– To go to the Viewing Email Templets page, click on the name of any email template.

– Click Del or Edit next to the template name in the list to delete or edit a template.

– To create any type of email template click on New Template.

After you have created several templates, sending emails will just be a matter of a few clicks. This will help you save much time in sales management and customer support roles. From there, it is easy to share the templates created with anybody in the organization. Use the information provided in this article to create Salesforce email templates.

How To Block WordPress Referrer Spam?

WordPress CMS

You probably have noticed a sudden increase in your website traffic with sites like 4webmasters.org, get-free-traffic-now.com, hongfanji.com, event-tracking.com and more appearing in your Google analytics or other monitoring tools.

But it’s actually too early to be happy. These are not any really sites that drive traffic to your website and help you increase your conversions and ROI. These are actually referrer spam that sends fake traffic to your website and leads you to malicious websites.

Referrer spam is becoming a huge problem for webmasters. It not only skews your user stats and monitoring information but also ruins your website’s rankings in the search engines.

What is a referrer spam?

Referrer spam is basically bots hitting your website in order to build backlinks. These bots then appear in your stats giving you an illusion that you are generating traffic. However, they are just fake links and only appear in your stats without ever visiting your website. Since these spams affect millions of sites and many webmasters explore the links when they see these sites in their referral stats.

Why is referrer spam a problem?

Maintaining a website is no laughing matter. Ever-growing competition, changing trends and the latest Google updates make running a website a challenging task. And the effects of referrer spam is in your stats add more difficulty to the job.

There are many who say referrer spam is harmless unless you actually open the link to check. Assuming you are not clicking on the links, there is still various problems associated with it. If your website hasn’t grown on a larger scale yet, it can merely affect your website analysis. However, if you are running a website with high rankings and millions of monthly visitors, referrer spam is actually a bigger problem for your business. It plays a crucial role in ruining your website traffic as well as rankings you have attained over so many years in a matter of few minutes.

Therefore, it becomes quite necessary to block this spam as soon as you get to know about it.

Blocking referrer spam in WordPress websites

WordPress has become a popular platform today to build websites and this is why WordPress websites are so vulnerable to threats and spamming. More than half of the WP sites are attacked every minute of the day by hackers and spammers.

Although you can protect your website by taking into consideration few important things such as regular backups, strong admin’s username and password, installing a security plugin and so much more.

Well, as a matter of fact, WordPress comes with a wide variety of plugins to help you extend the functionality and performance of your website. And referrer spam is no different.

There are various plugins available online that can be used to block it from your website provided you know which one to use. These plugins employ web services that are vigorously tracking referral spam sites and allow you to use the list to block them.

We personally use SpamReferrerBlock plugin that uses a blacklist to filter out your incoming traffic and block spam. Best of all, this plugin is an open source and thus available for free of cost.

How to install SpamReferrerBlock plugin?

You can either download it from the official website “wordpress.org” and upload it to the website or you can do it automatically on your website.

If you are using “install plugin” option in your WordPress website dashboard, follow these steps.

Step 1:

Open your website dashboard. Click plugins → install plugin. Now search SpamReferrerBlock in the search box on the right upper corner of the website.

Step 2:

Once you have found the plugin, hit install now and activate. Once activated, you need to configure this plugin to use it.

Step 3:

Click settings → Spam Referrer Block to configure the plugin. Clicking on the plugin’s settings page, there would be a text area under custom blacklist option where you can create your custom blocking list.

The plugin also allows you to monitor the already added list. You can easily download or upload the latest version of these blocked sites in the plugin’s settings page itself to stay up-to-date.

SpamReferrerBlock is a great plugin for those who don’t know how to monitor and block spam on their Google analytics account.

Adding/Removing User Roles Capabilities In WordPress

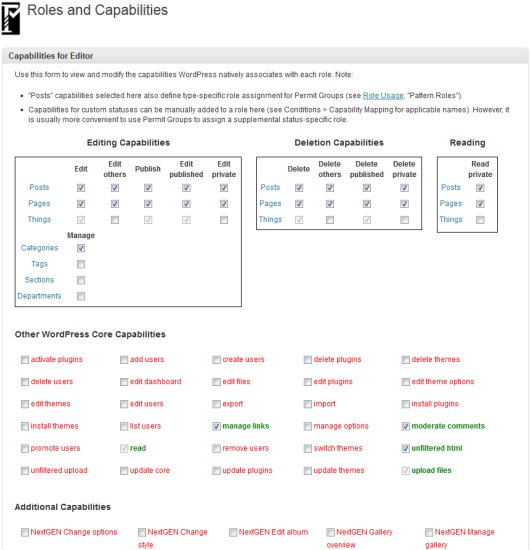
WordPress – the content management system or actually a simple but powerful content management system which powers approximately 20% of the websites over the web. But do you know that WordPress offers each of users’ a capabilities based on the role they have been assigned onto. Whether it will be an administrator, author, subscriber etc, each got its own set of roles.

Say, for example administrator got the ability to perform all actions on your WordPress site whereas author got fewer capabilities to perform the actions and so on for subscribers. It would be must to have an active understanding on and while assigning role to each. If you are running a multi-author site, then there will an additional need arise say if you want to modify capabilities of certain users or create custom user roles for some.

Capability Manager

Understanding the different stances that each of the users has got its own level of permissions which allow it to perform certain tasks on the website. It is on you as an administrator to decide which role to be given to whom, or either to take some or all the capabilities from the user. In this article we will discuss on how to add or remove user roles capabilities in WordPress.

To start with you need to first install and activate the plugin name Capability Manager Enhanced. Once activated, the plugin will provide a simple way to manage WordPress roles and capabilities. With using the plugin you will be able to easily create and manage roles and capabilities.

Moreover, if in case something went wrong, the plugin comes with an additional tool: Backup/Restore tool which lets you save roles and capabilities before making changes and reverting them if something goes wrong.

Plugin In Use: Capability Manager Enhanced

A simple way to manage WordPress roles and capabilities. With this plugin you will be able to easily create and manage roles and capabilities.

Features:

  • Manage role capabilities.
  • Create new roles or delete existing ones.
  • Add new capabilities to any existing role.
  • Backup and restore Roles and Capabilities to revert your last changes.
  • Revert Roles and Capabilities to WordPress defaults.

More Info | Download

How To Change The File Permissions In WordPress?

Paste Copy Paste Copy

You often wondered that how to restrict the person to read, write, modify or access your WordPress filesystems. There are different files and directories which each have their own set of permissions specifying on who and what can hold what rights. The role counted as more important in WordPress because one may need to access to write to files in WP-Content directory in order to enable certain functions.

Permission Modes 755 and 744

Permission Modes 744 Permission Modes 755

It is always better to understand permission modes first before going deeper into the process. Although the permission modes range 0000 to 0777, but permission modes 755 and 744 are the most important. The permission mode is computed by adding up the values for the user, the file group and for everyone else, making you understands well that what the permission mode in actual signifies:

  • Read 4 – Allowed to read files
  • Write 2 – Allowed to write/modify files
  • eXecute1 – Read/write/delete/modify/directory

Changing Permission Using an FTP Client

The file transfer protocol allows you to set permissions – termed as chmod or set permissions in the program menu – for both files and directories on your remote host. There are two files in a WordPress install which you will probably want to alter are the index page and the CSS controlling the layout.

Changing-File-Attributes-Filezilla

  • To do the changes you need to do it in your theme’s index.php file while remember here that the process is same for any file.
  • Now, notice on the last column – you will notice something like saying –rw-r-r- and similar – this represents permissions.
  • Right click on the “index.php” file and select “File Permissions” will open up window for you from where you can change the permission.
  • Doing above, a popup screen will appear.
  • Now, just delete the ‘Numeric value:’ and enter the number you need while don’t worry about the check boxes. Once done, click OK and you are done.

Changing Permission Using The Command Line

  • If in case you are having shell/SSH access to your hosting account, then you can use chmod to change file permissions although remember here that the method is mainly best for experienced users only.
  • Only two steps will lead towards making all the files in your WP-Content directory writable, but it’s still advisable to opt for safer alternative as doing one step wrong will take your whole site offline.
  • Try to modify just the directory – each of these commands first but if in case it does not work, and then go for recursive, which may make your themes files also writable. This can be done by replacing DIR with the folder you want to write in.
  • If those all fails, try them again in order with replacing –v with –R.

Photo Credit: Flickr/wiredforlego

Bringing Your WordPress Database To Default Settings

Have you ever found yourself in a situation when you felt like to reset your WordPress database to default settings? Say, for example, you want to move your website from local server to main server, then there will be a need arise to reinitialize your WordPress database back to its default settings. While a lot of people think to do all the things from scratch and ends in reinstalling WordPress, but there is other and better option also available for you. In this article, we are going to discuss about the plugin name WordPress Database Reset. Once you begin using the plugin, you will be able to easily bring your WordPress database to default settings.

Database

Plugin To Use: WordPress Database Reset

The plugin is a secure and easy way to bring your WordPress database back to its default settings while there will be no need to reinstall the WordPress from the scratch. To install, copy the wp-reset folder and its content to your wp-content/plugins directory, and then activate it while you could also use the built-in Add New plugin feature within WordPress. Once activated, you will automatically be redirected to the plugin page.

More Info | Download

Photo Credit: Flickr/Sean MacEntee

Moving WordPress From One Domain To Another

Transfer

In real it isn’t that much difficult to move whole of your WordPress website from one domain to another if all the steps followed properly. You will find plenty of resources over the web which talks about the topic, but moving a step further, we will be discussing on how one can move their WordPress website from one domain to another without losing anything on search engine front (i.e. SEO front).

Note: If you want to move your WordPress website from one server to another, then we recommend reading our earlier tutorial on this, which can be found at: How To Move A WordPress Site From One Server To Another?

Raising The Heat

There are high possibilities that you will get lost on doing this website moving transition from one domain to another, as well as results in nothing but risking all your hard work which in turn will ends up in affecting your search engine rankings. Not only this, but chances are there that your search traffic will also get affected as well. The process is simple, but as mentioned above, it needs to done with proper care.

On Starting Line – A Full Backup

You are about to begin the process. We assume here that your WordPress site setup is on example1.com and you are planning to migrate it to example2.com. Further, we are also assuming that you have a web hosting account setup and are much aware of web hosting control panel. Last, but not the least, we also assume that you know on how to use FTP (the file transfer protocol).

As from day one till now, we are always asking you take a full complete backup before you make yourself enter into such hefty transfer transitions. Create a full backup of your WordPress website. Doing so, there are plenty of plugins available for that – both free and paid options.

Suggested Reading: 7 Best Free Backup Plug-ins For WordPress

In The Race – Moving Your WordPress Website

Since you done with complete backup, now it’s time to start the domain migration process. We suggest you to download, install and activate the plugin called the Duplicator plugin on your old domain site example1.com.

Once activated, click on the new package create button followed by creating a duplicator package of your WordPress website. On clicking on the create button, the duplication process starts. Once the process completed, a zip package will get created, containing all your WordPress database and files.

On completion of this, you will then move to Duplicator package screen from where which you can download both the package and installer files on your computer. Next, connect FTP via your new site example2.com. Keep a note here that your root directory is completely empty with nothing into in it.

Now upload the installer.php file and your package zip file to your new site example2.com. Once done, simply launch the installer.php in a web browser. Add the required asked database information now for the new site and check on the box of Table removal.

Do keep a note here that your database is empty. Now, check on the box saying “I have read warning and notices” and click on the “Run Deployment” button. The plugin’s installer script will now install your database from old site example2.com. Now you are ready to install your themes and plugins.

On completion of the process, you will be notified the updated page where you are required to add an updated URLs. Although the plugin helps you identifying the URLs itself but its best to do it manually and once done, simply update it.

Finishing Line – Post Installation Steps

Since now you done with whole domain movement transition process, now re-save your WordPress permalinks.  Enter your login credentials in your new site example2.com’s WP-admin which you was using on your old site example1.com. Update the permalink by going to Settings >> Permalinks and you are done.

Now, delete the following files by going into the root directory using FTP: the installer.php, installer-data.sql and the installer-log.txt files. Followed by this, check on final stances like if there are any broken links, missing images, posts and pages with adding the proper redirects and notifying the search engines to keep all your search engines ranking same.

Photo Credit: Flickr/Alquiler de Coches

Note: Like the post, then make sure you do follow and like us on both Twitter and Facebook.

Ten ‘Must’ WordPress Snippets For Your Blog

Computer Program -3

Reduce spam by using .htaccess

Adding the following shortcode will let you reduce spam on your WordPress blog by using .htaccess. Simply paste the following lines into your .htaccess file but also make a note that you do make a backup of your .htaccess file before editing it.

Source: AllGuru.net

Display a thumbnail of any website

Simply paste the code below into your functions.php file.

Once done, you can use the snap shortcode:

Source: Geekeries.fr

Easily remove weird characters from your WordPress database

The shortcode will remove the weird characters from your WordPress database. All you have to do is simply run the following SQL query on your nWordPress database via the command line client or PhpMyAdmin.

Source: Jeff Starr

How to change WordPress editor font

Adding the following shortcode to your functions.php file will let you change the default WordPress editor font.

Source: DevPress

Removing the “read more” jump

Adding the shortcode into your functions.php file will remove the “read more” link from your blog which will automatically takes you to the article page.

Source: Alex Denning

Quick maintenance mode

Paste the following code into your functions.php file and you will be able to easily implement a maintenance mode on your WordPress blog.

Source: Skyje

Disable theme changing

Simply paste the code in your functions.php file to disable theme changing.

Source: Steve Taylor

Redirect feeds to a single format

Adding the following shortcode to your .htaccess file will let you direct all your feeds to a single format.

Source: Digging into WordPress

Simpler WordPress login url

Adding the following code to your .htaccess file will let you have the simpler WordPress login url.

Source: Kevin Chard

How to modify size of embedded videos

On adding the following shortcode to your theme’s functions.php file will let you modify the size of embedded videos.

Source: Shailan

Photo Credit: Flickr/hackNY.org

Want To Add Google Fonts In WordPress Post Editor, Try Supreme Google Webfonts Plugin

Love for Google is something that will be a never ending process so as that of the fonts Google offered. In the same way, fonts play an important role in your WordPress blog while if in case you didn’t know about Google Fonts, then you will get a smile over learning that Google has a library of about 300 webfonts which you can use on your WordPress site or blog. These fonts will load quickly as they are hosted on Google’s servers while with having an open source nature; you are completely free to use them the way you want to. In this article, we are going to share about a plugin name Supreme Google webfonts by which you can easily add these Google fonts in your WordPress post editor.

Plugin To Use: Supreme Google Webfonts

Google Fonts

The plugin will add all 291 Google webfonts into your visual editor panel when creating posts or pages. As soon as you installed and activated the plugin, you will notice an extra column at the top with a drop down list for choosing fonts to your post editor while if you are using a WordPress multisite, the plugin can be get added on all of your blogs.

More Info | Download

Allowing Authors To Revise Published Posts

There is no doubt that WordPress is a powerful blogging platform but thanks to its regular installation it doesn’t come fully equipped the way it has to be for multi-author blogs. If you are running a multi-author blog, then it is highly required to increase the workflow for authors giving them an extra mile of efficiency.

To letting this happen, you need to install and activate the plugin name Revisionary. Once it got activated, a whole new menu option will get added under Settings >> Revisionary. Although the default settings will work as a complete tool for lots of blogs, but still if your require something more, it would be best to review the settings and see if you need to add or change something.

Revisionary

Once you are done with installation, you will see that the plugin will create a new user role, called Revisor. Now, here you get a choice on to assign this role to an existing user or create a new user with the Revisor role. The Revisor role user can edit posts as revision and on completion they can submit it for review.

Plugin In Use: Revisionary

The plugin enables qualifies users to submit changes to currently published posts or pages. It will give ability to the contributors to submit revisions to their own published content. If these changes approved by Editor, it can be published the very same time or can be scheduled for future publication.

Feature:

  • Pending Revisions allow designated users to suggest changes to a currently published post/page
  • Scheduled Revisions allow you to specify future changes to published content (either via Pending Revision approval or directly by fully qualified author/editor)
  • Enchanced Revision Management Form
  • Front-end preview display of Pending / Scheduled Revisions with “Publish Now” link
  • New WordPress role, “Revisor” is a moderated Editor
  • Works with blog-wide WordPress Roles, or in conjunction with Press Permit or Role Scoper

More Info | Download

Page 1 of 21

Powered by WordPress & Theme by Anders Norén