WordPress Themes, Plugins, Tutorials, Tips And More...

Tag: WordPress Website Page 1 of 4

Moving WordPress From One Domain To Another

Transfer

In real it isn’t that much difficult to move whole of your WordPress website from one domain to another if all the steps followed properly. You will find plenty of resources over the web which talks about the topic, but moving a step further, we will be discussing on how one can move their WordPress website from one domain to another without losing anything on search engine front (i.e. SEO front).

Note: If you want to move your WordPress website from one server to another, then we recommend reading our earlier tutorial on this, which can be found at: How To Move A WordPress Site From One Server To Another?

Raising The Heat

There are high possibilities that you will get lost on doing this website moving transition from one domain to another, as well as results in nothing but risking all your hard work which in turn will ends up in affecting your search engine rankings. Not only this, but chances are there that your search traffic will also get affected as well. The process is simple, but as mentioned above, it needs to done with proper care.

On Starting Line – A Full Backup

You are about to begin the process. We assume here that your WordPress site setup is on example1.com and you are planning to migrate it to example2.com. Further, we are also assuming that you have a web hosting account setup and are much aware of web hosting control panel. Last, but not the least, we also assume that you know on how to use FTP (the file transfer protocol).

As from day one till now, we are always asking you take a full complete backup before you make yourself enter into such hefty transfer transitions. Create a full backup of your WordPress website. Doing so, there are plenty of plugins available for that – both free and paid options.

Suggested Reading: 7 Best Free Backup Plug-ins For WordPress

In The Race – Moving Your WordPress Website

Since you done with complete backup, now it’s time to start the domain migration process. We suggest you to download, install and activate the plugin called the Duplicator plugin on your old domain site example1.com.

Once activated, click on the new package create button followed by creating a duplicator package of your WordPress website. On clicking on the create button, the duplication process starts. Once the process completed, a zip package will get created, containing all your WordPress database and files.

On completion of this, you will then move to Duplicator package screen from where which you can download both the package and installer files on your computer. Next, connect FTP via your new site example2.com. Keep a note here that your root directory is completely empty with nothing into in it.

Now upload the installer.php file and your package zip file to your new site example2.com. Once done, simply launch the installer.php in a web browser. Add the required asked database information now for the new site and check on the box of Table removal.

Do keep a note here that your database is empty. Now, check on the box saying “I have read warning and notices” and click on the “Run Deployment” button. The plugin’s installer script will now install your database from old site example2.com. Now you are ready to install your themes and plugins.

On completion of the process, you will be notified the updated page where you are required to add an updated URLs. Although the plugin helps you identifying the URLs itself but its best to do it manually and once done, simply update it.

Finishing Line – Post Installation Steps

Since now you done with whole domain movement transition process, now re-save your WordPress permalinks.  Enter your login credentials in your new site example2.com’s WP-admin which you was using on your old site example1.com. Update the permalink by going to Settings >> Permalinks and you are done.

Now, delete the following files by going into the root directory using FTP: the installer.php, installer-data.sql and the installer-log.txt files. Followed by this, check on final stances like if there are any broken links, missing images, posts and pages with adding the proper redirects and notifying the search engines to keep all your search engines ranking same.

Photo Credit: Flickr/Alquiler de Coches

Note: Like the post, then make sure you do follow and like us on both Twitter and Facebook.

Getting Your WordPress Site ‘System Information’ Quickly

System Snapshot Report

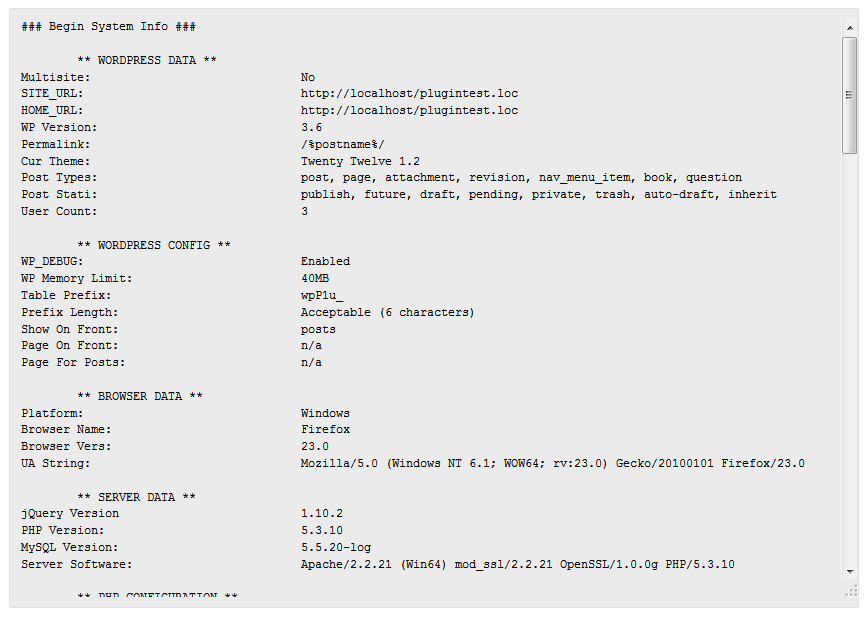
Quite a time when you feel a need on to find out your WordPress hosting environment system information, including PHP version installed, filesize limits, among others. While you can grab all this information by simply entering into your hosting provider’s cPanel or WHM or Windows panel on offer BUT to ease the job, we have got a plugin for you to use.

To do so, please install and activate the plugin name System Snapshot Report plugin. There is nothing you have about on technical side. Just simply on activation, all you have to do is to go to Tools >> Snapshot area in your WordPress dashboard and the information will be there in front of you.

Plugin To Use: System Snapshot Report

The plugin provides a snapshot of data to anyone who has been looking for assistance on better determining possible issues. The plugin is a utility plugin and provides you with system and WP specific data for support or troubleshooting. It does not actually diagnose any issues, or fix any underlying problems. It is simply for data collection purposes.

More Info | Download

Creating A Table Of Content In WordPress

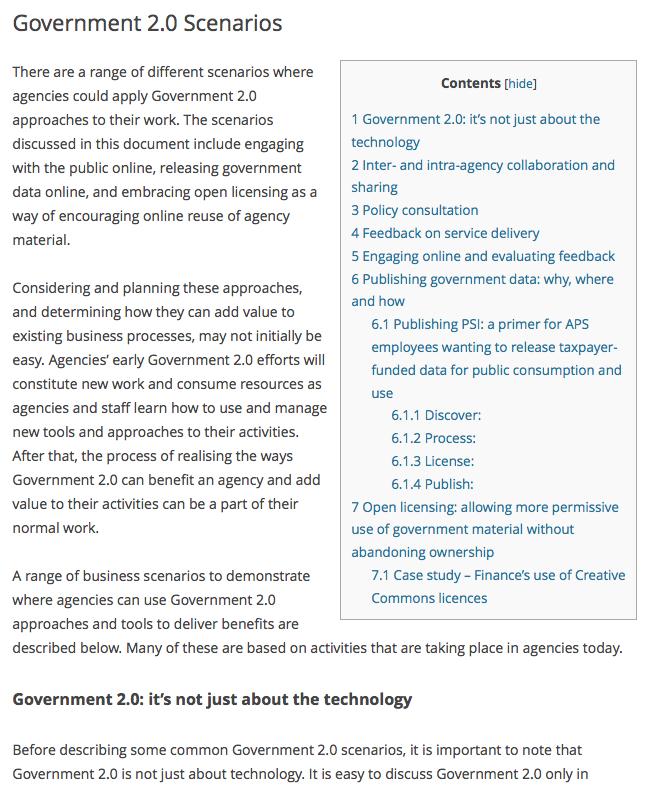
While we covered earlier about a plugin name Table of Content Plus pluginin a review article BUT still some of visitors get confused over on what context one can use the plugin or one can create a table of content in WordPress for either posts or pages.

Table Of Content Plus

Understanding Why It Is Necessary?

Adding table of content to your WordPress website will helps with search engine optimization as Google automatically adds a jump over to section links at the time when the site showed up in search results.

Why To Choose Plugin?

The process of creating a table of content can be done manually BUT it can be difficult for many WordPress beginners. Considering the situation, in this article, we have been showing you on how to achieve this.

Steps To Follow

  • You need to install and activate the plugin name Table of Content Plus.
  • On activation, you need to configure plugin settings. Simply click on Settings » TOC+ in your WordPress admin area.
  • You can select where and when you want your table of contents to appear in the main options tab while the plugin comes with default position set as “before the first heading”.
  • The second thing to keep an eye on is to decide on where the table of content will appear. By default, the plugin will display table of contents if a post or page having over four heading tags while if you wish, you can change it to the number of your choice.
  • There is also an option name ‘Auto insert for the following content types’ which on checking will enable table of contents for your posts as well automatically.

More Info | Download | Review

Getting The Complete phpinfo() In WordPress

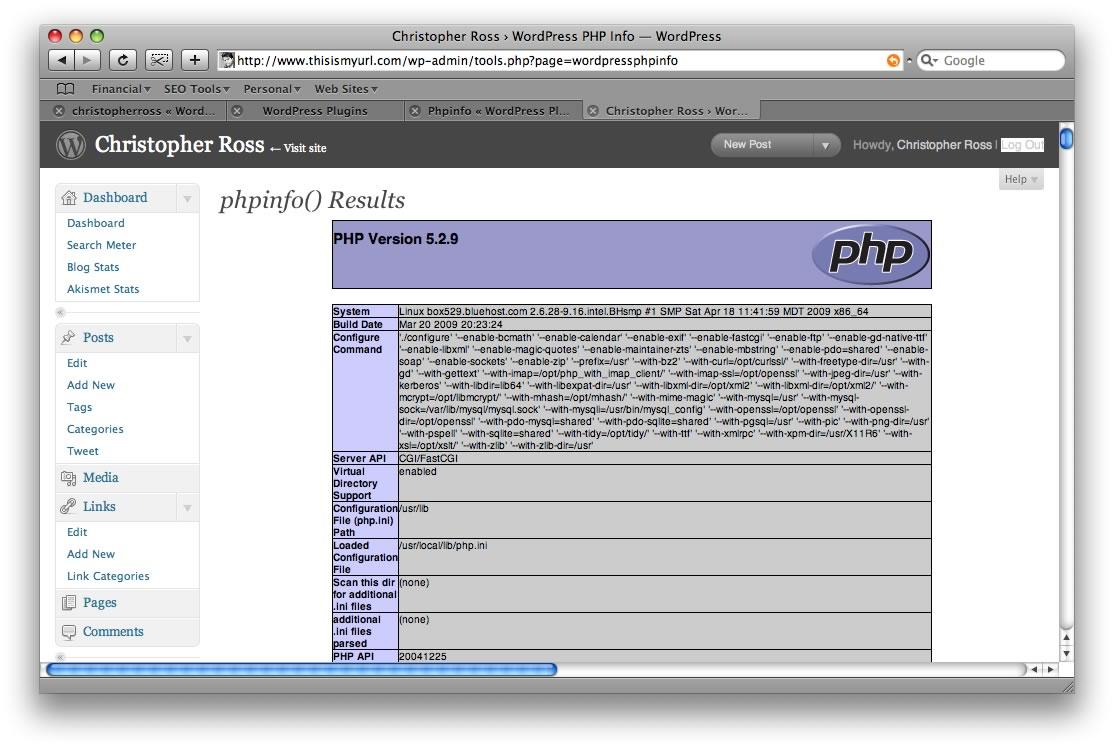
It is quite a time when asking for support; the developers might require some additional PHP information. The information includes like system information, build date, configure command, server API, virtual directory support, configuration file, and loaded configuration file among others.

Well to get all these information, you need not to dig deeper BUT with the use of the plugin name phpinfo(), you will get all these information with an ease. The information will be displayed under your dashboard’s Tools >> phpinfo().

Plugin To Use: WordPress phpinfo()

WordPress PHPInfo()

Key Features:

  • It’s important for a non technical administrator to be able to diagnose server related problems in WordPress.
  • But also rapidly retrieve feedback regarding their web server.
  • The plugin adds an option to an administrator’s Tools menu which displays standard phpinfo() feedback details to the user.
  • It is a very simple script, designed to help the non technical user get immediate feedback about their blog.

More Info | Download

Showcase Your WordPress Themes & Websites At Wp-Radar.com Today

WP-Radar-1

When working with WordPress themes, one can come across certain difficulties. It can be a technical one or simply one involving the look of the theme, a little about a side bar sticking out too much or a page behaving erratically on another device. Where do you seek help? Forums, ask a friend, ask the guys who made the theme? How about asking someone who has actually used the theme? One can get theme reviews on the site but not necessarily know how sites of other users look and behave. WP-Radar is a brand new solution to this problem, where you can find other users with the same theme, in an instant.

Based in Johannesburg, South Africa, WP-Radar is a very young IT start-up but contains more than 35,000 websites and a collection of over 7000 WordPress themes. The site uses a crawler to get this information and is adding new sites and themes everyday to its broad database. Users can also simply submit their websites to the site and gain access to information about other users using similar themes. Exchange of information pertaining to theme and websites occurs in a secure area that can only be accessed by members of the site. Membership is free for all but you need to register yourself first. Once you log in, you can contact site owners and seek answers to tweaks that you are looking to make.

WP-Radar-2

The idea behind WP-Radar is to bring users of WordPress themes onto a common platform where they can exchange information. However, certain users might not want to share information such as the theme being used for their popular website. In such a scenario, a simple contact form can be filled and sent to WP-Radar that will delist your site and theme information from their database.

However, WP-Radar is not just a congregation of WP Theme users. By bringing on board, theme developers as well, WP-Radar creates a new information channel that lets you address issues you face by seeking help from the best minds in the industry. With the experience of creating multiple themes and working with hundreds of customers, developers are the best help you can get and WP-Radar presents a unique opportunity to get in touch with the developing team of you theme.

An added advantage for developers to join the platform is the ability to showcase their new themes on the site. Since the site is free to use, this works like a great tool for free marketing of a brand new theme. Engaging with users on the site automatically increases a developer’s reputation, which can then be harnessed to promote the new theme as well. Additionally, you can also list your skills just as MySQL, Java, CSS etc. so that users looking for help in particular areas can find you easily.

WP-Radar-3

But it’s not just the developer that gets promoted; a developing team can get together on this platform and create a portfolio to create a larger impression. WP-Radar lets you create an entire company portfolio that not only includes team members but also their responsibilities. Reviews from users can also highlight individual profiles, adding more credibility to your work and your team. So, the next time, your theme is appreciated, the people behind the theme get appreciation too! WP-Radar thus provides opportunity for individual as well as company growth.

Overall, WP-Radar is an innovative and young way to bring users and developers onto a common platform, increase conversations and also promote new themes to a more targeted audience. Promoted by Khomba Business Networking that stands for pointing forward, WP-Radar is the pointing users and developers to the future of WordPress theme usage and promotion. Led by a young entrepreneur Hein van Vlastuin, Khomba is a proud South African company looking for bring innovative solutions to South Africa and beyond. WP-Radar is their first offering and we really liked it. Try it out today for your WordPress themes and we are sure, you will like it too.

Moving A WordPress Website To A New Host With Zero Downtime

WordPress Settings

Whether for one reason or for other, you did want to get rid of your current hosting provider. For the transaction, the first thing which definitely comes in your mind is that whether my website will face the downtime or not. Well, the answer is with the steps I shared below, you will face a total of zero downtime.

#1 The First Step

The first important thing is that you start reviewing and deciding on which new hosting company you want to opt for. There are number of options available but I believe with the experience you just gained with your current hosting provider, you does want to research more, talk with more people and moreover take time and put more efforts to gain about their experience with different hosting providers they are with.

While if you check the WordPress owned suggested hosting companies, you will find BlueHost and DreamHost, but on the other end, if you see different reviews available at WhoIsHostingThis, you will find people does had some real bad experience with these WordPress-recommended hosting companies, so it is highly advisable that you do your own research first in all possible proper manner.

#2 BackUp Your Site

You can start the process by installing and activating the plugin BackupBuddy on the website which you tend to move. Once activated, go to BackupBuddy >> Backup while if you have just installed the plugin for the first very time, then you will see a quick setup wizard, which you need to filled out. Once you filled up all the required details, the plugin will start backing up all the data which one done, you can download the backup.

#3 Migrating Your Site

To start the migration work, you will be requiring a copy of importbuddy.php as well as the complete backup of your site in a .zip file. You can download both these files by visiting BackupBuddy >> Restore/Migrate. Once the download is done, you need to start uploading the files now to your new web host. This can be done and achieved by using FTP.

Once both the files have been uploaded to your new host, you need now to access the importbuddy.php file in a browser although it will be resulting in getting you a 404 error as your website is still pointing to your old web host. You need to update the nameservers in order to get rid of this thing.

#4 Importbuddy Migration Wizard

In order to run the importbuddy migration wizard, you need to run it in a browser window by going at http://www.example.com/importbuddy.php, where example.com is your domain name. Once done, you will be required to authenticate your particulars at importbuddy.php file. On authentication, it will take you to the import wizard.

You will notice that the Importbuddy will automatically display the database backup you have uploaded. You need to click on the next step button to continue. Here importbuddy will extract all the contents of your backup file, followed by; it will show you the URL and database information. After this, importbuddy will import all your databases. Once it is done, you will now being moved to the migration wizard where importbuddy will update your website URLs and paths. Completing this step means you are done with migration process.

#5 The Final Step

While you have come to a final step but in order to finish the whole moving process, you will be requiring updating the nameservers. This can be done by going to your new host, check what nameservers your domain name are on followed by updating them to your domain control panel. You will see the nameservers pointing to the new host within 0 to 72 hours (the normal propagation time).

How To Manage Multiple WordPress Website Tension Free

WordPress CMS

Working on number of websites definitely causes a big havoc to you but what about managing all such WordPress websites of yours tension free. Well, the answer is YES, you can manage all the sites without any tension. People here at JustWP.org often asked us that what and how we can able to manage all the things, ranging from updating themes to plugins to keeping up backups of all of your WordPress websites. In this article, we will show up the different possible tools which you can think on opting up for.

Suggested Reading: Managing Multiple WordPress Sites From One Single Location: Top 5 Tools To Choose From

#1 ManageWP

ManageWP is the world’s first and finest WordPress management console, which was founded back in year 2010. The service offers users a tension free atmosphere giving you the full power as well as complete control in managing virtually any number of WordPress websites including powerful management, monitoring, backup, deployment, publishing and security tools.

Some Key Facts

  • The Founder: Vladimir Prelovac
  • Established in: 2010
  • The Team: 17 People
  • Support Response Time: 25 minutes

More Info | Review

#2 CMS Commander

CMS Commander lets you save time on your daily management tasks presenting the best WordPress control panel. With one single dashboard, you will be able to have all your websites in one single reach while you can control them in bulk with only a few clicks.

Some Key Facts (Statistics from May 2014)

  • Plugins Updated: 17,138
  • Backups Created: 37,728
  • Themes Installed: 4,018
  • Website Cloned: 3,236
  • Articles Written: 31,912
  • Comments Approved: 18,571

More Info | Review

#3 MainWP

MainWP allows you to securely manage all your WordPress sites from one powerful easy to use dashboard. MainWP is a self-hosted open source alternative.

Some Key Facts

  • Developer Friendly: Open Source and available on GitHub. MainWP Codex for Custom Extension Creation
  • Customize MainWP to Your Needs with Extensions
  • Private and Self-hosted Dashboard with Network Discovery Protection

More Info

Adding Custom Navigation Images In Your WordPress Website

Nav Menu Images

With new and new WordPress themes coming into existence, you too wish to update your theme with adding some more styling to it. While options are many BUT the one such main which you will be interested in more is to add custom menu images in your WordPress website. In this article, we covered on how you can add custom navigation images using a plugin.

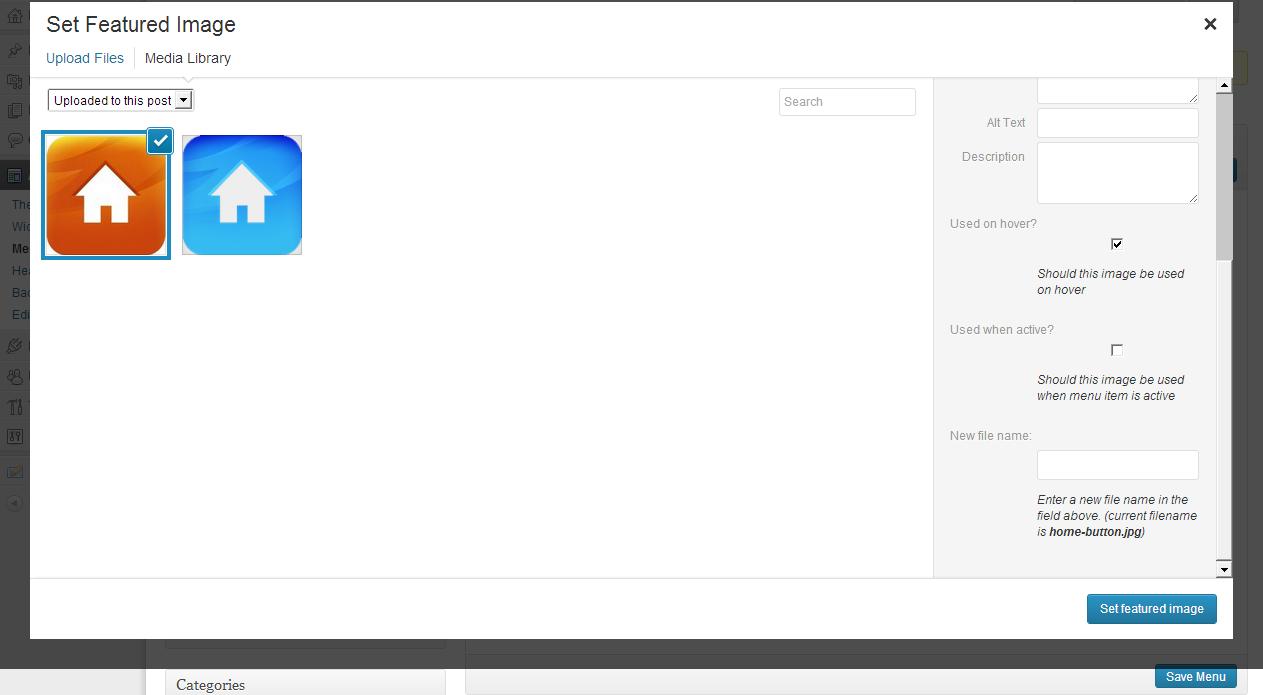
To start with, you need to install and activate the plugin name Nav Menu Images. Once activated, go to the menu screen and select a menu. The plugin enables you to upload images for nav menu items on a menu edit screen. By default, the nav images will be displayed instead of text for the menu items you selected.

Plugin To Use: Nav Menu Images

  • The plugin lets you to upload images for nav menu items on a menu edit screen.
  • By default, those images will be displayed instead of text for respective menu items.
  • You can also set images that will be displayed only when you hover menu item, or when menu item is of currently displayed page.
  • Developers can use many available filters to make their own way of displaying images.
  • Or even create a child class on top of base one. See source code for more ideas.

More Info | Download

What You Prefer? Full Post Or Excerpt For Your Archive Pages

Post

It’s quite a confusing task when one summoned on which one to use for archive pages – full post or just an excerpt. While both options got its own advantage and disadvantage and this is what we planned to discussed in this article.

When building a website, two factors one probably think of – 1. On how the whole of website will perform i.e. whether it will be easily brows-able by the visitors and they can easily find up what they are looking for. and 2. Does the website performing well in the search engines also i.e. does with the help of search engines, visitors will be able to locate the content on our website easily.

Load Time

Since a post contains a huge combination of both images as well as content and if one is using an excerpts in an archive pages, then without a doubt the page load time will increase. Plus, the visitors get an additional option on to browse and search the content via categories, tags, dates on offer.

Duplicate Content

Excerpts on your archive page will let you being saved from duplicate content issue in search engines. While if in case you put on the full post on archive pages, then it wills nothing but ends with duplicating the data as now the same content will be displayed in number of pages.

Pageviews and Bounce Rate

Site visitor often leave the website which loads slow. As again using the excerpts in your archive pages, you increase pageviews as well as reduce bounce rate automatically because in order to read the full content, visitors have to click through to enter into the full post page to read the content.

Who Wins At The End?

Two possibilities comes into existence here, if you are having your content short in length and don’t contain much images, then it is preferable to opt for full posts on your archive page BUT if the content is long and contains number of images, then without a doubt, it is good to use excerpts for your archive pages.

WordPress Plugins To Make Your Website Perfect

Plugin

So you are just a step away from launching your website (ofcourse based on WordPress platform) BUT dazzled on the way on thinking that what WordPress plugins you will be requiring on to make your website a perfect one. Well to ease your job here, we have collected the “high rated” and “most popular” plugins for you.

Google XML Sitemaps

The plugin will generate a special XML sitemap which will help search engines to better index your blog.

More Info | Download

W3 Total Cache

The plugin will improve user experience and page speed by increasing server performance, reducing the download times and providing transparent content delivery network (CDN) integration.

More Info | Download

WordPress SEO by Yoast

The plugin will improve your WordPress SEO: Write better content and have a fully optimized WordPress site using the WordPress SEO plugin by Yoast.

More Info | Download

Better WP Security

The plugin will improve the security of any WordPress site in seconds.

More Info | Download

Add Link to Facebook

The plugin automatically add links to published posts or pages to your Facebook wall, pages or groups and more.

More Info | Download

Contact Form 7

The plugin can manage multiple contact forms, plus you can customize the form and the mail contents flexibly with simple markup. The form supports Ajax-powered submitting, CAPTCHA, Akismet spam filtering and so on.

More Info | Download

NextGEN Gallery

The plugin provides a powerful engine for uploading and managing galleries of images, with the ability to batch upload, import meta data, add/delete/rearrange/sort images, edit thumbnails, group galleries into albums, and more.

More Info | Download

Fast Secure Contact Form

The plugin will let the user send emails to a site’s admin, and also send a meeting request to talk over phone or video.

More Info | Download

MailPoet Newsletters (formerly Wysija)

The plugin send newsletters, post notifications or autoresponders from WordPress easily, and beautifully.

More Info | Download

Advanced Custom Fields

The plugin is the perfect solution for any WordPress website which needs more flexible data like other Content Management Systems.

More Info | Download

WP Super Cache

The plugin generates static html files from your dynamic WordPress blog. After a html file is generated your webserver will serve that file instead of processing the comparatively heavier and more expensive WordPress PHP scripts.

More Info | Download

Wordfence Security

The plugin is a free enterprise class security plugin that includes a firewall, virus scanning, real-time traffic with geolocation and more.

More Info | Download

TablePress

The plugin enables you to create and manage tables, without having to write HTML code, and it adds valuable functions for your visitors.

More Info | Download

Ozh’ Admin Drop Down Menu

The plugin lets all admin links available in a neat horizontal drop down menu. Saves lots of screen real estate!

More Info | Download

Google Analytics for WordPress

The plugin allows you to track your blog easily and with lots of metadata.

More Info | Download

Page 1 of 4

Powered by WordPress & Theme by Anders Norén